|
E-mail services comes will most hosting accounts. Therefore more than likely you will want your E-mail to be hosted on our servers with your web site. Once your web hosting account is created you will need to go into the Web Hosting Control Panel and create your E-mail accounts. To do so just click on the "Mail Icon" in the control panel, then click on "Manage, Add & Remove Accounts". There are many other features there as well with regards to Spam control and mail forwarders that you may want to take advantage of.
Before you attempt to download E-mail with a E-mail client such as Outlook or Outlook Express please make sure that you have set up the E-mail account from the Web Host Control Panel and have successfully logged into the account from our Web Mail System. If you can access it from the web mail system then you should be able to retrieve it from virtually a POP3 compliant E-mail client program.
Email Clients POP3 access
Outlook Express
If you are using Outlook Express for your E-mail client on your computer please go to the Control Panel and log in.
Click on "Mail"
Click on "Add & Remove Accounts"
Then click on the "Outlook Express Auto Configuration" for any or all of the E-mail accounts you have set up.
If this does not work then use the information below in the Outlook section to set up the configuration correctly. They are very similar.
Outlook
If you would like to use Outlook as your E-mail client and would like to retrieve your E-mail via POP3.
New Account: We assume you have already set up an account in this explanation. If you have not please do so by opening Outlook and clicking "Tools", "Accounts", "Add", "Mail Account". Out look will ask you a series of questions with regards to the information below. Please read about the settings below so that you will understand what values to enter. If you enter something incorrectly don't worry because you can go back to correct the values.
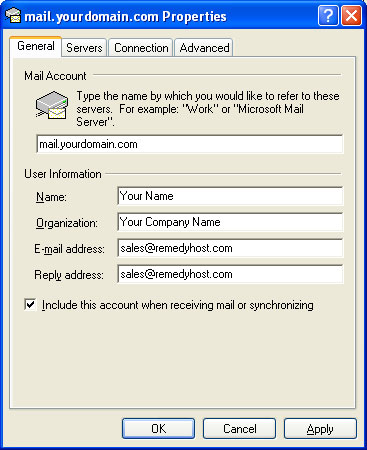
Editing Existing Account: Typically editing account information can be done by opening Outlook and clicking on "Tools" , "Accounts" and highlighting the account you would like to edit and clicking "Properties". You will then be presented with a window that looks similar to the window below depending on the version of Outlook you are using. The setting on the General tab are very self explanatory. Please adjust them to best meet your needs.

You will then click on the "Servers" tab.
You will be presented with a window similar to the example below. These settings are crucial to connection, download and upload of your E-mail.
Incoming POP3: Please adjust this setting to: "mail.yourdomain.com" where "your domain.com" is the value of the web address you have retained and are using. If this does not work please feel free to try "mail.remedywebhosting.com"
Note: Netscape users and select others may experience problems with collecting their mail. In this case, mail server login name must be written with the "%" , "+", or the ":" character instead of the @ sign, e.g. username%example.com
Outgoing SMTP: Please adjust this setting to: "mail.yourdomain.com" where "your domain.com" is the value of the web address you have retained and are using. If this does not work please feel free to try "mail.remedywebhosting.com"
|


